Let us be honest. Gun cleaning feels more like a chore than a satisfying ritual. No matter how diligent about maintenance you are, the hours spent scrubbing carbon off bolt carrier groups and trying to get into every tiny crevice with a brush leaves most a feeling of “good enough.” It isn’t the meticulous, thorough clean we should be striving for. That’s when the ultrasonic cleaner comes into play.
Watch the Ultrasonic Cleaning video!
How did we get into Ultrasonic Cleaners?
About a year ago a friend turned me on to ultrasonic cleaners, but I was skeptical. Could they really work that well? And what about the cleaning solution? I was worried about using something too aggressive that might damage my parts, especially the delicate aluminum components. After some research, I decided to take the plunge and bought both an ultrasonic cleaner and the UltraSonic Gun Cleaner Solution.
This blog may earn a small commission from purchases made through links on this page, at no additional cost to you. These affiliate links help support the blog’s upkeep and allow us to continue creating valuable content for our readers. Thank you for your support!

UltraSonic Cleaner Solution for Gun Parts
Cleaning solution that quickly removes all dirt, residue and Dissolves oil, grease, and powder build up.
Buy Now on Amazon
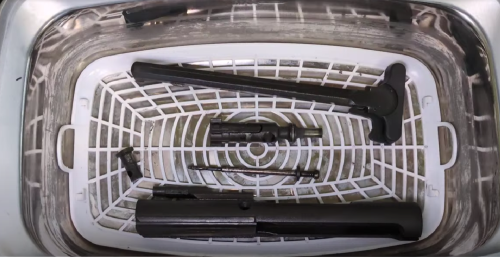
A year later, I can confidently say it’s one of the best changes I’ve made. This change significantly improved my cleaning routine. The first thing that surprised me was how little of it you need. It’s a concentrate, so a small bottle lasts a ridiculously long time. You mix it with water at a 1:5 ratio, and you’re ready to go. The process is really easy. I just drop my disassembled internal parts, everything from AR-15 bolts to handgun slides into the cleaner’s basket, press a button, and walk away (for not very long!). The most I ever leave the parts in for is about 8 minutes. After that, you have diminishing returns. The rest of the caked on carbon will need a scrub anyway.

The Results of Ultrasonic Cleaning
And the results? Nothing short of amazing. The ultrasonic cleaner’s cavitation process, powered by this solution, reaches spots that a brush and patch could never touch. I’ve watched layers of baked-on carbon and fouling just melt away from my parts. After the cycle is done, all that grime is sitting at the bottom of the tank, and my parts come out looking almost brand new.
Any downsides to Ultrasonic Cleaners?
Our biggest concern, as mentioned, was the safety on different metals. We’ve used this solution countless times on various steel, stainless, and aluminum parts. We’ve even thrown in some more delicate aluminum components, always keeping the cleaning intervals short just a few minutes at a time. The result? Every single part has come out undamaged. No discoloration, no corrosion, no issues whatsoever. It has held up to a full year of consistent use without a single problem. This solution is specifically designed to be non-corrosive and safe on gun parts. They list on their description that it is “Non-Corrosive to Aluminum and Metal Parts, Contains no Petroleum Type solvents.” However, they do NOT recommend its use on parts with a Cerakote finish. It might strip the finish from the part.
If you’ve been on the fence about ultrasonic cleaning or are looking for a solution that really works without a bunch of harsh chemicals, give this one a try. It’s been my go-to for a year, and I don’t see that changing anytime soon. This solution would make a great gift for someone! Check out our holiday gift guide.