Going to a shooting range for the first time can be incredibly intimidating. Between managing recoil, learning proper grip, and focusing on shot placement, it is easy to feel overwhelmed. Many new gun owners find themselves standing in a lane, punching holes in paper without a clear purpose. It can be difficult to measure real improvement. Some even ask “What should I be doing to improve or get better?” Enter our shooting drills for beginners.
These are a structured, purposeful way to build foundational shooting skills. These drills strip away the pressure of speed and additional gear, allowing you to focus entirely on the fundamentals. The basis of good shooting is accuracy, weapon handling, and fluid motion. Our guide breaks down seven essential exercises designed to help you build confidence at the range effectively. While these drills are specifically designed for the freedom of dispersed shooting on public land, many can be easily adapted for use at a structured range with a firing line. They can even be done at home with Dry Fire – Learn More about Dry Fire.
In this guide, you’ll find everything you need to know about these shooting drills for beginners, including:
- Tips, tools, and best practices to succeed with these beginner drills.
- What are shooting drills and why are they important?
- How to setup for shooting drills.
Read on to learn what defines a shooting drill and why structured practice is the fastest way to build your confidence as a new shooter.
What are Shooting Drills?
Firearm shooting drills are structured, repetitive exercises designed to improve shooting proficiency by focusing on specific skills. These are pre-planned courses of fire that help shooters refine fundamentals. For this beginner guide, focus on two things.
1). Safety, this is always number one. You can’t do anything with firearms without first following all safety rules.
2). Landing shots on the target.
There are many key aspects to a “Drill” and those are Repetition, Targeted Focus, Discipline, and Process Improvement. It’s just training, you are getting out there and getting your practice and repetitions in.
Why are shooting drills for beginners important?
I probably don’t need to tell you why it’s important to train, but let’s dive in. There is an old saying, “The body can’t go where the mind hasn’t been”. I would attribute this to any sort of training. There is a reason why athletes do the drills they do for all sports from running to football. You are training your mind to “go places and perform actions” when running these shooting drills.
- Muscle Memory – doing drills will build your muscle memory so eventually its second nature to acquire sight picture and form your grip. This is something that a beginner should be working towards.
- Confidence Building: As a new shooter it often takes multiple sessions to begin building confidence in what they are doing. Doing drills is an effective way to build your confidence and solidify in your brain that this is something you are comfortable doing.
- Establish a Baseline: As you are starting out it’s important to figure out where you are and do a self check on your skill level to see what can be focused on and improved. There are a lot of evaluation type drills, which I will link to at the end if you are needing to self evaluate.
How to Setup for the Drills
For these drills there are 2 things you will need. 3 Targets, and 3 Target Stands. Don’t worry I’ve got a great recommendation for cheap target stands that work in almost any environment.
The Setup
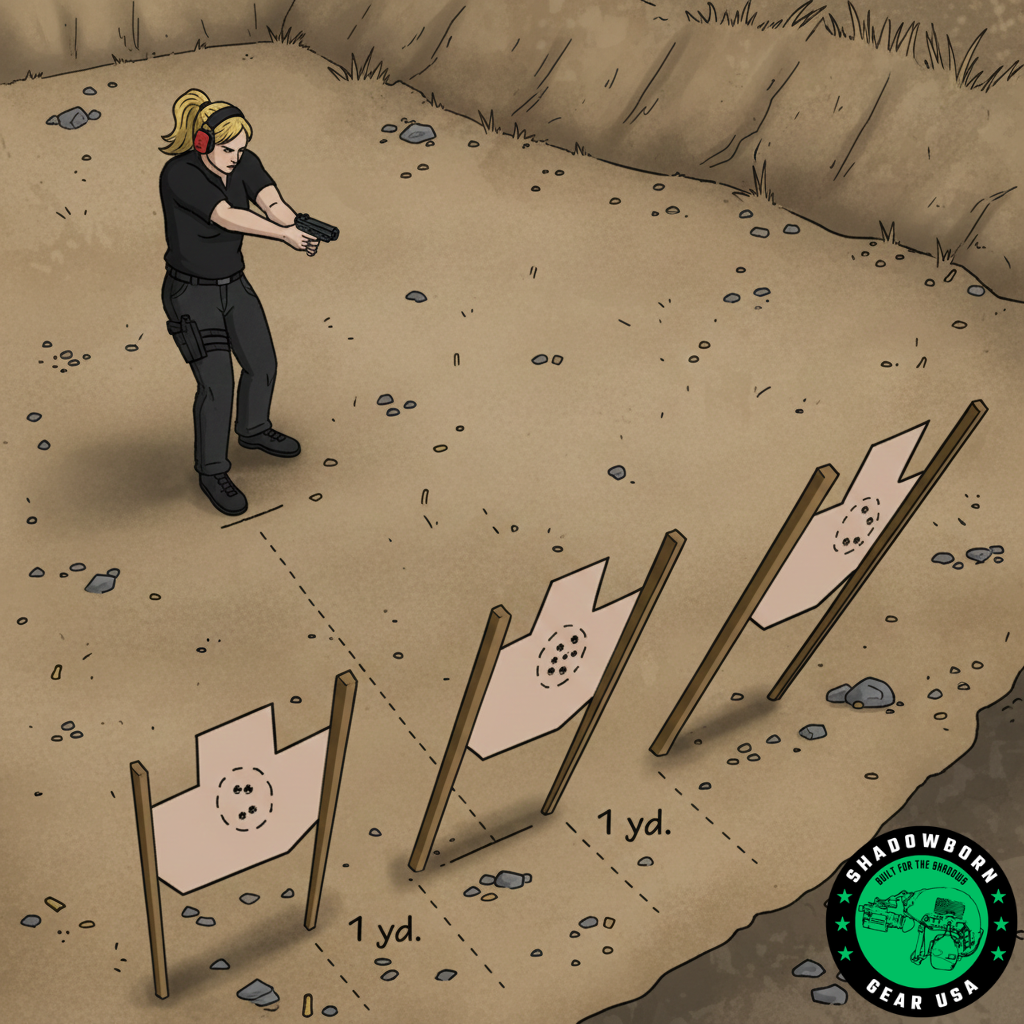
Three full-size or center-torso silhouette targets (e.g., USPSA/IPSC cardboard).
These drills are all shot at 5-7 yards whichever you want to start at.
They are set up all in line with each other.
Spacing: Position targets 3 feet (1 yard) apart from each other.
Height: Position targets so shoulders are approximately 5 feet off the ground.

No Fancy gear for these drills. No holster, No Shot timer. Just a gun and the targets. The reason for this is that these are shooting drills for beginners, and we don’t want unnecessary distraction. Shot timers ARE great training tools, don’t get me wrong, (Check out our Shot Timer Review) but we don’t want any unnecessary pressure while doing these drills.
Target Stands
If needed I highly recommend 3 cinder blocks from Home Depot/ Lowes for about 2 bucks each as target stands. With those you can use a few 1x2s cut to about 4.5 feet each and use a staple gun to secure cardboard targets to the 1x2s. Once the 1×2 are in the cinder block holes just fill them with dirt or rocks and this will keep the 1x2s and targets steady.

What are the Drills?
Starting Position – Round Count – Target to Focus on
1# Low Ready – Fire 1 – Single Target (alternate which target you aim for.)
2# Low Ready – Fire 2 – Single Target (alternate which target you aim for.)
3# Low Ready – Fire 1 at Each Target (3 rounds total)
4# 1R1 (Fire 1 – Reload – Fire 1) Start with 1 chamber and 0 in the Magazine. Fire and reload at the slide lock. I know this drill is being moved away from by serious shooters, but it still provides some value to new shooters.
5# Low Ready – Fire 1 at each Target Standing, Kneel Fire 1 at each target – 6 rounds total.
6# Low Ready facing 180 away from Targets – Turn and Fire 1 round at each target – 3 rounds total. (This is ⅓ of an “El Presidente Drill”
7# Low Ready – Fire 1 at each target, Strong Hand only, transition to weak hand only Fire 1 at Each target – 6 shots total.
Bonus Drill #8 – Malfunction Drill with Snap Cap – Works best if you have a buddy at the range with you. Give them one of your mags with 5 rounds and a snap cap. Have them place the snap cap in any position of the mag. Your goal is to fire all 5 rounds. Clear the malfunction safely and efficiently.
Bonus Drill #9 – El Presidente – If you completely ace all of the other drills and end up needing another to do while you are out practicing, run the El Presidente.
This is where you start at 180 degrees facing away from the targets, on the signal spin and shoot 2 in each target, Reload and shoot another string of 2 in each target. 12 Shots total.
Beginner Drill Tips & best practices
When practicing these drills, always prioritize safety as your absolute primary function. Remember that no amount of accuracy outweighs the importance of muzzle discipline and keeping your finger off the trigger. To get the most out of your range time, focus on quality over quantity. Make every single press of the trigger a conscious, deliberate action. Don’t forget to dry-fire at home between range trips. Dry fire builds the essential muscle memory for grip and sight alignment without the distraction of recoil. All of these drills can be done at home with Dry fire!
Start using these shooting drills for beginners today
Every master was once a beginner, and the key to bridging that gap is consistent, intentional practice. Now that you have these drills in your arsenal, head to the range and start turning these into muscle memory. Don’t worry about being perfect on day one, just focus on safety. Stay patient with your progress, and enjoy the process of becoming a more capable shooter. The journey to precision starts with a single round, so grab your gear and get out there!
Helpful Links:
Benchmark yourself with these shooting drills:
Everyday Marksman – Fast and Accurate Enough
USA Carry: The FAST: An Efficient Test of Your Shooting Skills
LetsGoShooting: The Baseline Drill